Have Your Cake & Eat it Too!

As a Mommy of three and wife of 11 years, my daily routine is a whirlwind. In an effort to carve out some "me time" and explore a creative outlet, I have picked up a new hobby. Baking! This blog highlights my journey into baking and chronicles my sporadic adventures.

Sunday, May 22, 2011

Wilton Wonder Mold Pan ~ 1st Try

I'm gearing up for my baby girl's 2nd birthday.  To celebrate, I want to make her a Dora Fiesta Dress cake.  My Mother in Law gave me her baking pan collection and I was over the moon to discover the Wilton Wonder Mold Pan inside.  I know this pan also makes a rockin' barbie cake so I will add that to my "to do" list since Lily is wishing for a Rapunzel cake for her birthday.  I'm surprised at the diversity of the pan as I also discovered it can make a myriad of cakes, including a volcano and rollercoaster which my son would adore.  In the meantime, I bought a little dora cake topper accessory that pokes into the top of the dress and I am going to practice one before I make the real one. 

The first phase of my practice is determining if I can make this cake with success.  My main challenges are:  Will the cake stick? (Not at all, as long as you grease and flour well.  Even the center piece slid out with ease for me)  How much batter to use? (If you add more than one box, you can cut the cake while it is in the pan still by lining your knife up to the top of the pan and shaving off the curved top to create a nice, flat platform.  In my case, I need a petite dress and one box was plenty) And how long to cook it for?  (At least an hour)

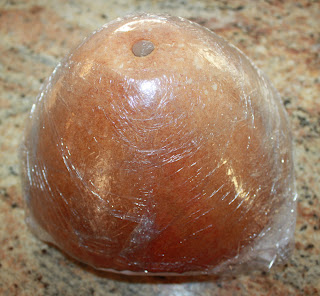
For this first try, I used a white cake mix.  The instructions found on the Wilton site say to use one mix.  I'm no dummy so I read plenty of reviews first that said the pan needs 2 mixes and lots of cooking time.  Another tutorial on youtube recommends sticking with less batter, and adding a 9 or 10 inch round to the bottom.  In my case however, my Dora accessory is small and I may end up shaving the bottom off of the skirt to cut this cake to size.  There was no time to decorate today, so instead I shrink wrapped it while warm to seal in the flavour. 

When all was said and done, the came came out beautifully.  I'm sure that I would be open to cutting and stacking round cakes to create a skirt if I HAD to.  But I've got this handy pan now and it saved me oodles of time not having to layer cakes.  I like the flexibility of being able to build it up with an additional 9" round beneath it if needed, or shave it shorter for a petite dress.  The Wilton website has so many cake design ideas that can be done with this pan which makes it a wise investment.  In my case the pan was free, and I love FREE!  Now I just have to figure out the best way to cut a wider hole in the middle in order to fit a full sized barbie in there, instead of a half bodied doll with a stick bottom.  What little girl wants a creepy half-barbie in her cake?

Here is the process:

Assembled, washed and dried my Wonder  Mold Pan

Sprayed it all with Pam and floured it

Cooked it in my skinny top oven for at least an hour.  I just waited until it nolonger jiggled and began to pull away from the sides, using an hour as my benchmark.
Cool it for at least 10 minutes before removing it from the pan.

Laid the Paper on top of the pan, put the cooling rack on the paper and then inverted the pan and the cake came right out with no assistance required.

Laid my warm cake on a cross of saran wrap to seal in the flavour.  I'm freezing this until I have time to practice decorating it. 
A frozen cake will cut with less crumbs and I plan to shave off some of the height by trimming it at the base.

Snowball Coconut Cupcakes

- Recipe -
Cake
● 1 egg● 3 egg whites
● 1/3 cup cream of coconut (make sure to mix it well in the can)
● 2 T. water
● 1 t. vanilla extract
● 1 cup cake flour
● 1/2 cup sugar
● 1-1/2 t. baking powder
● 1/4 t. salt
● 6 T. butter, cut into small dice
● 1 cup packed sweetened shredded coconut (about 8 ounces)
Coconut Flavored Whipped Cream:
● 1/2 cup heavy cream
● 1 T. sugar
● 1 t. coconut extract
Preheat oven to 325 degrees. Line 12 cup muffin pan with cupcake liners.
I enjoyed polling my facebook friends to determine what cupcake recipe to try next.  I learned that That Takes the Cake isn't a democracy.  What can I say?  I went with a recipe that I had all of the ingredients for.  Results of the poll to be posted.  Technically this fabulous recipe requires a cream cheese frosting, but I adapted it into a flavoured coconut whipped cream instead because I had whipping cream in the fridge.  These cupcakes are chock full of real coconut and incredibly delicous.
1. In large measuring cup, add whole egg, egg whites, cream of coconut, water & vanilla. Mix together well. Set aside.
2. Combine flour, sugar, baking powder, and salt in mixer bowl. Add butter a bit at a time, and mix until butter is pea-sized.
3. With mixer still running, add the egg/cream of coconut mixture. Mix until light and fluffy on medium speed, about 3 minutes. Add shredded coconut and mix until just combined.
4. Divide batter in cupcake pan. Bake for 25 minutes.
5. Cool pan for 5 minutes, then remove cupcakes to rack to cool completely.
To Make Flavored Whipped Cream:
1. Beat the heavy cream, sugar and extract until soft peaks form.
2. Then spoon or pipe the whipped cream on top of the cupcakes.
Note: If you're going to pipe the whipped cream on, make a double recipe of whipped cream.
When you're ready to frost the cupcakes, put the 1-1/2 cups of coconut into a medium bowl. Frost the cupcakes with the icing, then dip each cupcake, upside down, into the bowl of coconut, making sure to coat the top completely.

Snowball cupcake Ingredients

Make note:  Recipe required Cream of Coconut (thick and textured, used in pina coladas), I used Coconut cream (cream consistency yet flavourful)

Pour wet ingredients into measuring cup

whisk them around

gradually add dice cubes of butter

gradually adding wet ingredientsn to butter and dry ingredients mixture

SO-MUCH-COCONUT!

This is what makes the cupcakes amazing

See how dense the batter is?

This is what I used for icing.  Whipping cream, coconut flav and teeny bit of superfine sugar

Just a small amount.  It whips up nicely.

These are lightly done.  Mommy can't risk burning these or my kids won't touch them with a 10 foot pole.

Icing almost complete

SOMEBODY got some cooling racks!

This is what they'll look like dipped in coconut

But be sure to whip your whipped topping to a stiff consistency to hold all that coconut on

Proud to say I took this picture with my chin.

Dip in a bowl of coconut.  Fluff coconut between dips.

PERFECTION

For variety, I piped some whipped cream onto half and sprinkled with coconut for a more mild coat.

The finished batch!

The biggest fan of these cupcakes

My son testing one out

This little lady proceeded to crumble it and throw it all over the floor. 
Don't let that stop you from trying these out.  They're great, despite her masacre of the cupcake.

Sunday, May 8, 2011

1st Layer Cake ~ Trying my hand at cake levelling

Happy Mother's Day to me!  My family bought me a set of Pyrex bakeware for Mother's Day.  It's not in yet, but I know about it since I picked it out myself.  HOW ORIGINAL!  Perfect gift for the budding baker.  Thanks family!  I'm especially thankful for all of the amazing little hand crafted pieces of artwork from my children.  These kids rock.

Lots of together time today.  Breakfast feast with my own Mommy.  A drive to take in some countryside.  Some yardwork and outdoor play.  And alas, some baking. 

Lily was my partner in crime today.  When all was done, Griffin asked for a piece and said "Hey Dad!  When it's Father's Day, the boys will bake a cake together too!"  and my heart broke in an instant.  He felt left out.  Waaah!  So I reassured him that my next baking project with be with him alone.  Silly Mommy thought he was having fun with his outside time.  My son, I could go on forever...but I digress. 

I really just wanted to try my hand at two particular things today.
A)  Levelling cakes. 
B)  Smoothing Icing with a sheet of paper.

Here are the pics and captions of the day.
Two 8" white cakes

I'm still learning.  These were slightly cracked.  Still delish.

I fooled around with a mixture of icing and mandarin oranges.  I ended up not using this. 
I'll use whipped cream with the oranges next time.  Or vanilla pudding?

My first levelled cake.  I used this big knife instead of the Wilton levelling device. 
Saved the cake tops for future cake pops.

Making a damn around to keep the filling from spilling over.

Chocolate pudding

All spread

The top layer levelled, and then set upside down on our chocolate pudding filling.

My Wilton Cake Icer and 16' featherweight bag.

First time trying this out too. 

I had a lot of bubbles.  No biggie though.

Smoothing it out with the spatula

Using some letterhead to attempt smoothing the layer after 10 minutes. 
In this case, 10 min wasn't long enough to create a crust and this method didn't work for me. 
Boo hiss!

Tried it with wax paper to see if I'd have a different result.  Still didn't work.

Handed things over to my girl on Mother's Day.

Making pink flowers

Not sure how this jumped so far into the pics, but Lil tinted her own icing.

Cute border of flowers.  Not bad for a 7 year old!

Adding some yellow nonpareils for the centers.

Pink nails!

Starting to feel like spring!

Some of her finished flowers

Working on the lettering now.  This is where it got funny.

GOT to love this cake.

I better not find this on Cake Wrecks!  For a 7 year old, this is a Cake Masterpiece!